
티스토리 뷰
NSTextAttachment 속성을 이용해서 UILabel 앞에 이미지 붙이기
import UIKit

class ViewController: UIViewController {

    @IBOutlet weak var testLabel: UILabel!
    override func viewDidLoad() {
        super.viewDidLoad()

        // 테스트할 텍스트 생성
        let text = "텍스트 앞에 이미지 넣기"
        // NSAttributedString 으로 변경
        let NStext = NSAttributedString(string: text)
        // attributeString 생성
        let attributedString = NSMutableAttributedString(string: "")
        // UIImage 가져오기
        let image = UIImage(systemName: "person.fill")
        // NSTextAttachment()
        let imageAttachment = NSTextAttachment()
        // NSTextAttachment() 에 이미지 넣기
        imageAttachment.image = image
        // attributeString 에 이미지 넣기
        attributedString.append(NSAttributedString(attachment: imageAttachment))
        attributedString.append(NStext)
        testLabel.attributedText = attributedString
    }
}
위와 같이 사용한 후 실행하면

텍스트 앞에 이미지가 들어가게 됩니다.
이제 이 과정을 UILabel extension에 넣어서 함수화 해보겠습니다.
import UIKit

class ViewController: UIViewController {

    @IBOutlet weak var testLabel: UILabel!
    override func viewDidLoad() {
        super.viewDidLoad()
        // Do any additional setup after loading the view.

        testLabel.text = "함수로 텍스트 앞에 이미지 넣기"

        let image = UIImage(systemName: "person.fill")
        testLabel.addLeadingImage(image: image)
    }
}

extension UILabel {
    /// 글자 앞에 UIImage 넣어주고 " " 하나 띄움
    func addLeadingImage(image: UIImage?) {
        guard let text = attributedText, text.length > 0 else { return }
        guard let image = image else { return }
        let attributedString = NSMutableAttributedString(string: "")
        let imageAttachment = NSTextAttachment()
        imageAttachment.image = image

        attributedString.append(NSAttributedString(attachment: imageAttachment))
        attributedString.append(text)
        attributedText = attributedString
    }
}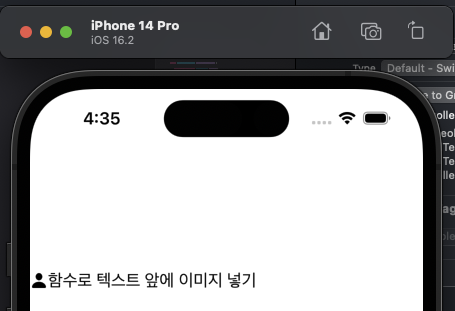
이런 식으로 이미지를 넣을 수 있습니다.
현재 이미지는 SFSymbol 이미지라서 글자 크기에 맞게 변경이 되지만 일반 이미지의 경우
글자보다 크거나 작을수 있습니다. 그럴 경우 bounds 를 이용해서 이미지의 위치와 크기를 조정해줄 수 있습니다.
상위 코드에 bounds 를 직접 지정해보면
imageAttachment.bounds = CGRect(x: 0, y: 40, width: 40, height: 40)
이미지의 y축, 너비, 높이 모두 바뀐것을 볼수 있습니다.
마지막으로 NSMutableAttributedString 의 값을 확인해보겠습니다.
{
    NSAttachment = "<NSTextAttachment: 0x600002ded5e0>";
} {
}함수로 텍스트 앞에 이미지 넣기{
    NSColor = "<UIDynamicCatalogSystemColor: 0x6000013fd240; name = labelColor>";
    NSFont = "<UICTFont: 0x142e08150> font-family: \".SFUI-Regular\"; font-weight: normal; font-style: normal; font-size: 17.00pt";
    NSParagraphStyle = "Alignment 4, LineSpacing 0, ParagraphSpacing 0, ParagraphSpacingBefore 0, HeadIndent 0, TailIndent 0, FirstLineHeadIndent 0, LineHeight 0/0, LineHeightMultiple 0, LineBreakMode 1, Tabs (\n    28L,\n    56L,\n    84L,\n    112L,\n    140L,\n    168L,\n    196L,\n    224L,\n    252L,\n    280L,\n    308L,\n    336L\n), DefaultTabInterval 0, Blocks (null), Lists (null), BaseWritingDirection -1, HyphenationFactor 0, TighteningForTruncation NO, HeaderLevel 0 LineBreakStrategy 65535 PresentationIntents (\n) ListIntentOrdinal 0 CodeBlockIntentLanguageHint '(null)'";
    NSShadow = "NSShadow {0, -1} color = {(null)}";
}
이러한 구조로 텍스트 앞에 NSAttachment가 붙어 있게 됩니다.
여러번 호출하면 그 앞에 계속 NSAttachment 가 붙는 형식으로 처리할 수 있고
뒤에도 붙이는 것 또한 가능합니다.
예를 들면 글자 앞에 이미지형식의 배지가 계속 붙는다면 스토리 보드로 일일히 작업하는 것보다 UILabel 에 image 를 붙이는 함수를 이용해서 계속 붙여나가면 좀 더 편리한 유지보수가 될 수 있을것 같습니다 😃
'UIKit' 카테고리의 다른 글
| iOS UIKit - UILabel에 이미지 넣으면서 문자단위로 개행(네이버 시리즈 제목처럼 표현하기) (1) | 2023.03.06 |
|---|